有 library (如 OpenCV) 可直接調用。
沒 library 建議至少要有 matrix library,自己刻很累。
demo 圖片故意挑 bpp 24, no compression , height = 200 , width = 169 ,
順便把 width alignment 問題解決掉。主要做以下測試
1. 轉置 transpose
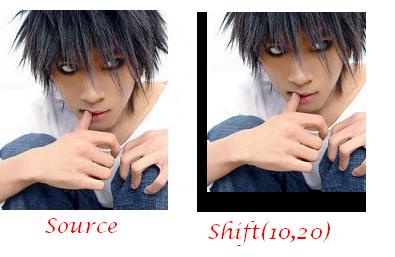
2. 平移 offset
3. 縮放 scaling
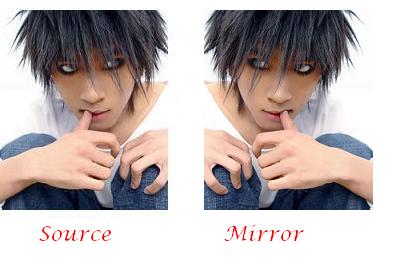
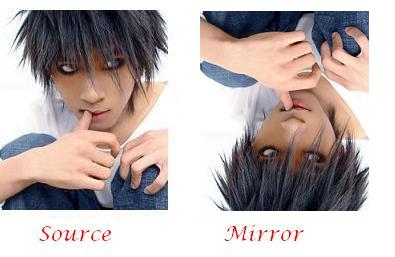
4. 鏡像 mirror
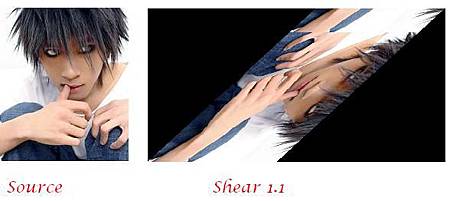
5. 斜變 shear
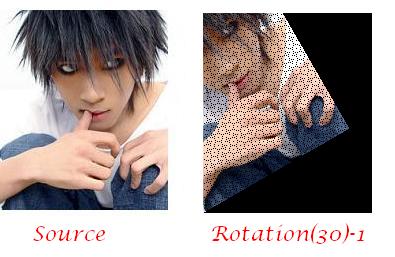
6. 2d 旋轉 rotation : 繞原點、繞 (a,b)、resize
7. 3d 旋轉投影
程式碼優化不是本文重點,為表達清晰,犧牲效能 <效能非常差>。
桶狀變型概念簡單,要有一點線代底,有機會再講。
通用變數與資料型態
byte : unsigned char
h, height : 原始影像高度
w, width : 原始影像寬度
nh : 新影像高度
nw : 新影像寬度
x, y : 原始影像之點 P(y, x)
nx, ny : 新影像之點 P(ny,nx)
byte r[h][w], g[h][w], b[h][w] : 原始影像之 rgb
byte nr[h][w], ng[h][w], nb[h][w] : 新影像之 rgb
說明用變數
x0 , y0 : 原始影像位置 (y0,, x0)
x1 , y1 : 新影像位置 (y1,, x1)
轉置, Transport
nh = width
nw = height
nr[ny][nx] = r[x][y]
- void bmp_trans(
- byte** nr, byte** ng, byte **nb, /* 新影像 rgb */
- byte** r, byte** g, byte** b, /* 舊影像 rgb */
- int height, int width /* 原始長寬 */
- )
- {
- int x,y;
- for(y=0; y<height; ++y){
- for(x=0; x<width; ++x){
- nr[x][y] = r[y][x];
- nb[x][y] = b[y][x];
- ng[x][y] = g[y][x];
- }
- }
- }

平移 (a, b) , Shift
nx = x0 + a
ny = y0 + b
可寫成逆運算型式
x0 = x1 - a
y0 = y1 - b
- void bmp_shift(
- byte** nr, byte** ng, byte **nb, /* 新影像 rgb */
- byte** r, byte** g, byte** b, /* 舊影像 rgb */
- int height, int width, /* 原始長寬 */
- int ox, int oy) /* 位移大小 */
- {
- int y, x, nx,ny;
- for(ny=0; ny<height; ++ny){
- for(nx=0; nx<width; ++nx){
- //nx=x+ox, ny=y+oy;
- x=nx-ox, y=ny-oy;
- if(x<width && y<height && x>=0 && y>=0) {
- nr[ny][nx] = r[y][x];
- ng[ny][nx] = g[y][x];
- nb[ny][nx] = b[y][x];
- } else {
- nr[ny][nx]=ng[ny][nx]=nb[ny][nx]=0;
- }
- }
- }
- }
可原地進行,但需判斷 a, b 之正負號,決定複製之方向性 (由頭到尾或由尾到頭)。
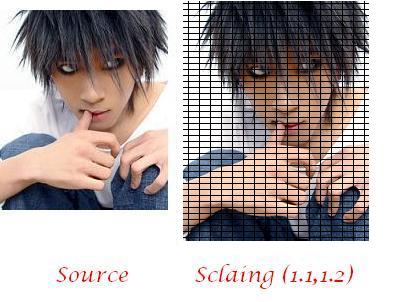
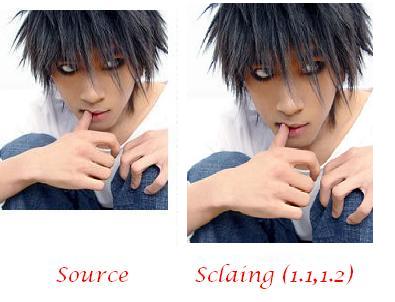
縮放 (a, b) 倍, Scaling
x1 = a*x0
y1 = b*y0
- void bmp_scaling_1(
- byte** nr, byte** ng, byte **nb, /* 新影像 rgb */
- byte** r, byte** g, byte** b, /* 舊影像 rgb */
- int height, int width, /* 原始長寬 */
- double sa,double sb) /* 縮放倍率 */
- {
- int nh = (int)(height * sa + 0.5); // 四捨五入
- int nw = (int)(width * sb + 0.5); // 四捨五入
- int x,y ,x1, y1;
- memset(*nr,0,nh*nw);
- memset(*ng,0,nh*nw);
- memset(*nb,0,nh*nw);
- for(y=0; y<height; ++y){
- for(x=0; x<width; ++x){
- y1 = (int)(y*sa+0.5), x1=(int)(x*sb+0.5);
- nr[y1][x1] = r[y][x];
- ng[y1][x1] = g[y][x];
- nb[y1][x1] = b[y][x];
- }
- }
- }
上面那格線不是我事後畫的。用三個 memset 較差,不過不是這裡重點。部份情況將造成新影像格線現象,以逆運算方式為佳。
x0 = x1 / a;
y0 = y1 / b;
- void bmp_scaling_2(
- byte** nr, byte** ng, byte **nb, /* 新影像 rgb */
- byte** r, byte** g, byte** b, /* 舊影像 rgb */
- int height, int width, /* 原始長寬 */
- double sa,double sb) /* 縮放倍率 */
- {
- int nh = (int)(height * sa + 0.5); // 四捨五入
- int nw = (int)(width * sb + 0.5); // 四捨五入
- int x,y ,x1, y1;
- for(y1=0; y1<nh; ++y1){
- for(x1=0; x1<nw; ++x1){
- y=(int)(y1/sa+0.5), x=(int)(x1/sb+0.5);
- nr[y1][x1] = r[y][x];
- ng[y1][x1] = g[y][x];
- nb[y1][x1] = b[y][x];
- }
- }
- }
可原地進行,但必須先判別 scale > 1 或 scale <1 才可決定複製方向性,內插法修正影像資料為佳。
左右鏡像, Mirror
x1 = Width - x0 - 1
y1 = y0
- void bmp_mirror_1(
- byte** nr, byte** ng, byte **nb, /* 新影像 rgb */
- byte** r, byte** g, byte** b, /* 舊影像 rgb */
- int height, int width) /* 原始長寬 */
- {
- int x, y;
- for(y=0; y<height; ++y)
- for(x=0; x<width; ++x){
- nr[y][x]=r[y][width-x-1];
- ng[y][x]=g[y][width-x-1];
- nb[y][x]=b[y][width-x-1];
- }
- }
利用 swap 可原地進行。
上下鏡像, Mirror
x1 = x0
y1 = Height - y0 - 1
- void bmp_mirror_2(
- byte** nr, byte** ng, byte **nb, /* 新影像 rgb */
- byte** r, byte** g, byte** b, /* 舊影像 rgb */
- int height, int width) /* 原始長寬 */
- {
- int x, y;
- for(y=0; y<height; ++y)
- for(x=0; x<width; ++x){
- nr[y][x]=r[height-y-1][x];
- ng[y][x]=g[height-y-1][x];
- nb[y][x]=b[height-y-1][x];
- }
- }
利用 swap 可原地進行。
斜變, shear / skew
< 長方形變平行四邊形 > 令傾斜率為 r
x1 = x0 + r * y0
y1 = y0
- void bmp_shear_1(
- byte** nr, byte** ng, byte **nb, /* 新影像 rgb */
- byte** r, byte** g, byte** b, /* 舊影像 rgb */
- int height, int width, /* 原始長寬 */
- double sr) /* 斜變率 */
- {
- int x, y, nx, ny;
- int nh = (int)(height+sr*width+0.5);
- int nw = width;
- for(y=0; y<height; ++y){
- for(x=0; x<width; ++x){
- ny = (int)(y+sr*x+0.5), nx=x;
- nr[ny][nx] = r[x][y];
- ng[ny][nx] = g[x][y];
- nb[ny][nx] = b[x][y];
- }
- }
- }
或
x1 = x0
y1 = r * x0 + y0
- void bmp_shear_2(
- byte** nr, byte** ng, byte **nb, /* 新影像 rgb */
- byte** r, byte** g, byte** b, /* 舊影像 rgb */
- int height, int width, /* 原始長寬 */
- double sr) /* 斜變率 */
- {
- int x, y, nx, ny;
- int nh = height;
- int nw = (int)(width+sr*height+0.5);
- for(y=0; y<height; ++y){
- for(x=0; x<width; ++x){
- ny=y, nx = (int)(x+sr*y+0.5);
- nr[ny][nx] = r[x][y];
- ng[ny][nx] = g[x][y];
- nb[ny][nx] = b[x][y];
- }
- }
- }
可原地進行,需判別 r 之範圍。以內插法修補影像為佳。
2d 逆時針旋轉 theta 角 - 繞原點 , 2d Rotation
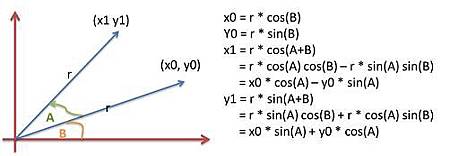
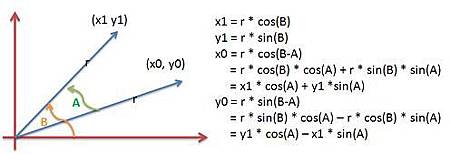
畫圖,用 sin(a+b) = sina cosb + cosa sinb 等和角公式可推出。
x1 = x0 * cos(theta) - y0 * sin(theta)
y1 = x0 * sin(theta) + y0 * cos(theta)
順時可將 theta 改成 -theta,故 sin(-theta) = - sin(theta) , cos(-theta) = cos(theta),帶回上式即可得,不再贅述。
- void bmp_rot_1(
- byte** nr, byte** ng, byte **nb, /* 新影像 rgb */
- byte** r, byte** g, byte** b, /* 舊影像 rgb */
- int height, int width, /* 原始長寬 */
- double theta) /* 旋轉角度 */
- {
- int x, y, nx, ny;
- double vcos, vsin;
- theta *= 0.01745329252; // 轉弳度
- vsin = sin(theta), vcos = cos(theta);
- for(y=0; y<height; ++y) for(x=0; x<width; ++x)
- nr[y][x]=ng[y][x]=nb[y][x]=0;
- for(y=0; y<height; ++y){
- for(x=0; x<width; ++x){
- nx=(int)(vcos*x - vsin*y+0.5);
- ny=(int)(vsin*x + vcos*y+0.5);
- if(ny>=0 && ny<height && nx>=0 && nx<width){
- nr[ny][nx]=r[y][x];
- ng[ny][nx]=g[y][x];
- nb[ny][nx]=b[y][x];
- }
- }
- }
- }
上述會有「空洞現象」,即不是每個 (x1, y1) 都會對應到 (x0, y0) 故要求 inverse rotation matrix ,一樣畫圖及和角公式可推得。
x0 = x1 * cos(theta) + y1 * sin(theta)
y0 = -x1 * sin (theta) + y1 * cos(theta)
- void bmp_rot_2(
- byte** nr, byte** ng, byte **nb, /* 新影像 rgb */
- byte** r, byte** g, byte** b, /* 舊影像 rgb */
- int height, int width, /* 原始長寬 */
- double theta) /* 旋轉角度 */
- {
- int x, y, nx, ny;
- double vcos, vsin;
- theta *= 0.01745329252; // 轉弳度
- vsin = sin(theta), vcos = cos(theta);
- for(ny=0; ny<height; ++ny){
- for(nx=0; nx<width; ++nx){
- x = (int)( nx * vcos + ny * vsin + 0.5);
- y = (int)(-nx * vsin + ny * vcos + 0.5);
- if(y>=0 && y<height && x>=0 && x<width){
- nr[ny][nx]=r[y][x];
- ng[ny][nx]=g[y][x];
- nb[ny][nx]=b[y][x];
- } else {
- nr[ny][nx]=ng[ny][nx]=nb[ny][nx]=0;
- }
- }
- }
- }
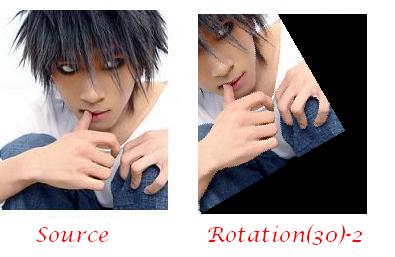
2d 逆時針旋轉 theta 角- 繞 (ox,oy) , 2d Rotation
上述之 Rotation 是以原點為中心進行旋轉,若欲以 (ox,oy) 為中心進行旋轉時,
正向運算不推了,對反運算而言,掌控幾個技巧
(1) nx , ny 先平移 (-ox,-oy),得到 nx2, ny2
nx2 = nx - ox , ny2 = ny - oy
(2) nx2, ny2 經由旋轉矩陣,旋轉 theta 度,得到對應的 x, y
x = nx2 * cos(theta) + ny2 * sin(theta) + ox
(3) 再將 x, y 平移 (ox, oy)
y = -nx2 * sin(theta) + ny2 * cos(theta) + oy
- void bmp_rot_3(
- byte** nr, byte** ng, byte **nb, /* 新影像 rgb */
- byte** r, byte** g, byte** b, /* 舊影像 rgb */
- int height, int width, /* 原始長寬 */
- double theta) /* 旋轉角度 */
- {
- int x, y, nx, ny;
- double vcos, vsin;
- // 假設對中心進行旋轉
- int ox = (width-1)/2;
- int oy = (height-1)/2;
- int nx2, ny2; //平移後之點
- theta *= 0.01745329252; // 轉弳度
- vsin = sin(theta), vcos = cos(theta);
- for(ny=0; ny<height; ++ny){
- for(nx=0; nx<width; ++nx){
- // 平移 ox,oy
- nx2 = nx - ox, ny2 = ny - oy;
- // 再旋轉, 平移(-ox,-oy)
- x = (int)( nx2 * vcos + ny2 * vsin + 0.5 + ox);
- y = (int)(-nx2 * vsin + ny2 * vcos + 0.5 + oy);
- // 寫入
- if(y>=0 && y<height && x>=0 && x<width){
- nr[ny][nx]=r[y][x];
- ng[ny][nx]=g[y][x];
- nb[ny][nx]=b[y][x];
- } else {
- nr[ny][nx]=ng[ny][nx]=nb[ny][nx]=0;
- }
- }
- }
- }
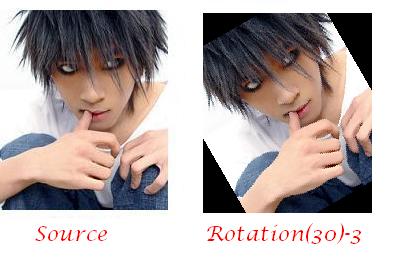
2d 逆時針旋轉 theta 角- resize , 2d Rotation
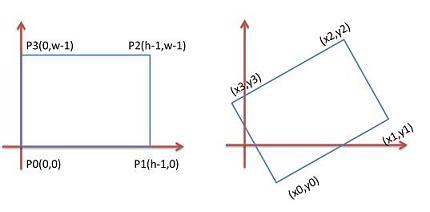
新的 size 計算不難,這裡用的是無腦的方式。把原本的四個角先計算得到旋轉後的座標,再找 max_x, max_y, min_x, min_y,新的寬度和長度做相減可得到 ( 會有些許誤差 )
- #define MAX(a,b) ( (a) > (b) ? (a) : (b))
- #define MIN(a,b) ( (a) < (b) ? (a) : (b))
- void bmp_rot_size(
- int *n_height, int *n_width, /* 新影像之寬高 */
- int height, int width, /* 原影像之寬高 */
- double theta) /* 旋轉角度 */
- {
- double x1, y1, x2, y2;
- double x3, y3, x4, y4;
- double fx1, fx2, fx3, fx4;
- double fy1, fy2, fy3, fy4;
- double vcos, vsin;
- double max_x, max_y, min_x, min_y;
- theta *= 0.01745329252; // 轉弳度
- vcos = cos(theta), vsin = sin(theta);
- // 原本四個角點
- x1=0, y1=0;
- x2=width-1, y2=0;
- x3=width-1, y3=height-1;
- x4=0, y4=height-1;
- // 旋轉後四個角點
- // nx=(int)(vcos*x - vsin*y+0.5);
- fx1 = vcos*x1 - vsin*y1;
- fx2 = vcos*x2 - vsin*y2;
- fx3 = vcos*x3 - vsin*y3;
- fx4 = vcos*x4 - vsin*y4;
- // ny=(int)(vsin*x + vcos*y+0.5);
- fy1 = vsin*x1 + vcos*y1;
- fy2 = vsin*x2 + vcos*y2;
- fy3 = vsin*x3 + vcos*y3;
- fy4 = vsin*x4 + vcos*y4;
- // find max_x, max_y, min_x, min_y
- max_x = MAX( fx1, MAX(fx2, MAX(fx3, fx4)));
- min_x = MIN( fx1, MIN(fx2, MIN(fx3, fx4)));
- max_y = MAX( fy1, MAX(fy2, MAX(fy3, fy4)));
- min_y = MIN( fy1, MIN(fy2, MIN(fy3, fy4)));
- *n_width = (int)(max_x-min_x+0.5);
- *n_height= (int)(max_y-min_y+0.5);
- }
做完 resize 要做 rotation 時,無論對哪個點做旋轉都一樣的,因最後一定會被平移,使得最左下角的座標為 (0,0)。這裡便不再推導,直接看程式碼。
- void bmp_rot_4(
- byte** nr, byte** ng, byte **nb, /* 新影像 rgb */
- byte** r, byte** g, byte** b, /* 舊影像 rgb */
- int n_height, int n_width, /* 新影像長寬 */
- int height, int width, /* 原始長寬 */
- double theta) /* 旋轉角度 */
- {
- int x, y, nx, ny;
- double vcos, vsin;
- double h2, w2; // 舊影像長寬之一半
- double nh2, nw2; // 新影像長寬之一半
- double ox, oy; // offset
- h2 =0.5*(height-1), w2=0.5*(width-1);
- nh2=0.5*(n_height-1), nw2=0.5*(n_width-1);
- theta *= 0.01745329252; // 轉弳度
- vsin = sin(theta), vcos = cos(theta);
- // 算 offset
- ox = -nw2 * vcos - nh2 * vsin + w2;
- oy = nw2 * vsin - nh2 * vcos + h2;
- for(ny=0; ny<n_height; ++ny){
- for(nx=0; nx<n_width; ++nx){
- x = (int)( nx * vcos + ny * vsin + 0.5 + ox);
- y = (int)(-nx * vsin + ny * vcos + 0.5 + oy);
- // 寫入
- if(y>=0 && y<height && x>=0 && x<width){
- nr[ny][nx]=r[y][x];
- ng[ny][nx]=g[y][x];
- nb[ny][nx]=b[y][x];
- } else {
- nr[ny][nx]=ng[ny][nx]=nb[ny][nx]=0;
- }
- }
- }
- }

3d 旋轉投影
看一下 3d 繞 y 軸旋轉公式。
x2 = x1 * cos(theta) + z1 * sin(theta)
y2 = y1
z2 = -x1 * sin(theta) + z1 * cos(thea)
投影到 xy 平面時,z 分量代 0 進去,得到
x2 = x1 * cos(theta)
y2 = y1
直接用這組公式代入時必須注意,它是「繞 y 軸旋轉」,而不是繞「圖片本身中垂線」旋轉,所以當 cos(theta) < 0 的時候 (也就是 90<= theta <= 270 ),這張圖會被轉到原本可視範圍之外。
一種改善的方式是直接判斷 cos(theta) < 0 是否成立,若成立的話 x2 計算時再加上 width 當 offset 做修正。這裡提另一想法。
令 cos(theta) = r ,原本公式可改寫如下
x2 = 0
y2 = y1 , if r =0
x2 = x1 * r
y2 = y1 , if r > 0
x2 = -x1 * r + width = width - (x1 * r)
y2 = y1, if r < 0
看起來便清楚多了。在 r > 0 的情況下,實際上影像是進行 (r, 1) 之 scaling;在 r < 0 之情形下,先做 (r, 1) 之 scaling 後,再進行左右之 mirror。所以欲達到自身旋轉的效果時,只需要將 scaling 後之結果進行 x 軸之 offset 即可。實做細節較繁雜,此處不再示例。




 留言列表
留言列表


 {{ article.title }}